Jenkins on Raspberry Pi
On Neofonie Mobile GmbH team event, the Fedex Day, we came upon the idea of visualising the build status of our projects on our Continuous Integration system. While investigating existing notification solutions, we found none that suited our needs; they were either not eye-catching (like email notifications, which we already used), or they were too expensive to deploy to the whole team. Thus, during our Fedex Day (alright, we had prototyped hardware in advance), we created devices that would inform us visually about the current project build status and build progress with the aim for the devices to be affordable, easy to create, and wireless capable.
Since Jenkins CI checks project compilation and performs tests on every source change already but only presents the results on the web-based dashboard or through emails, we wanted to improve the way to observe build status. We wanted it to be more direct and effortless (and a little bit decorative too – there is nothing like a green glow in the office at the end of the day), so we ended up with dedicated hardware for observing build status hanging on a wall in the developers’ rooms.
Architecture
The project idea is really simple. The central element of the system is a Raspberry Pi computer that periodically asks Jenkins CI about the status of projects. Each endpoint, an indicator device, has a unique ID assigned. The Raspberry Pi maps the project’s name to the proper device ID, and then it broadcasts the build status wirelessly.
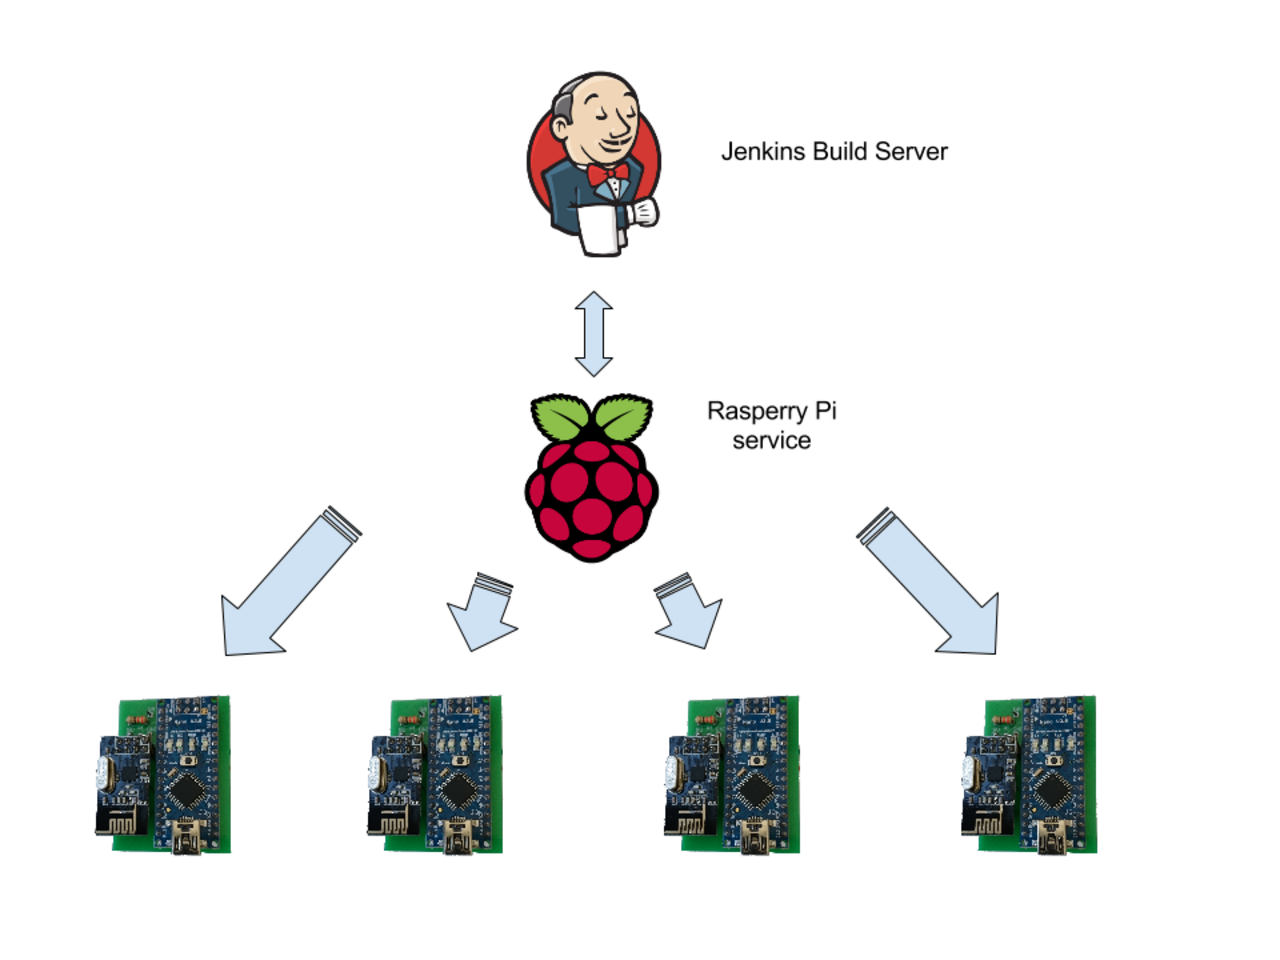
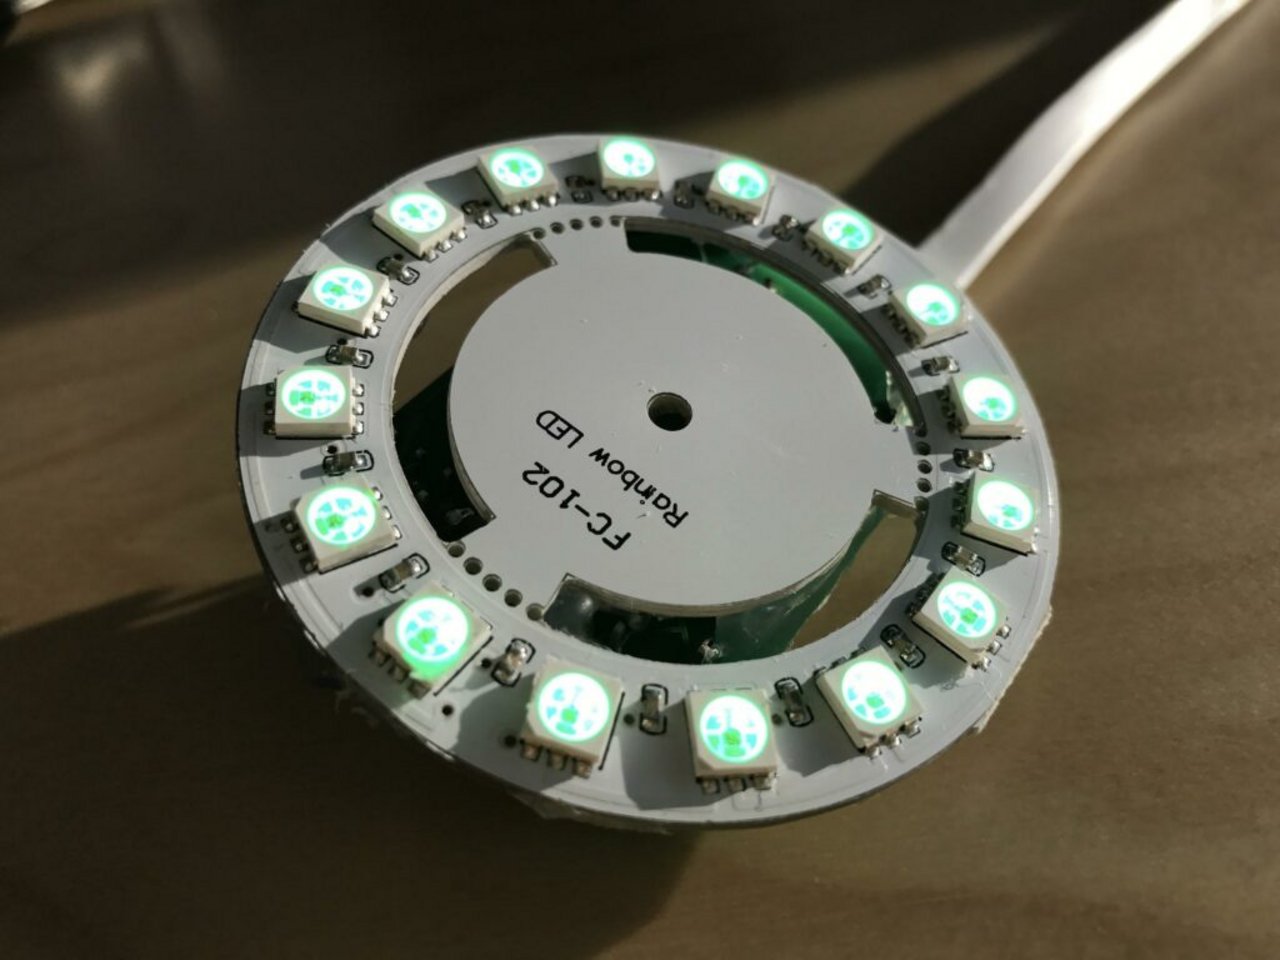
Upon receiving the message address to a particular indicator, the latter updates the LED ring animation. Depending on the received build state it goes from subtle green fading for successful builds, up to alarming red blinking for broken builds.
Hardware
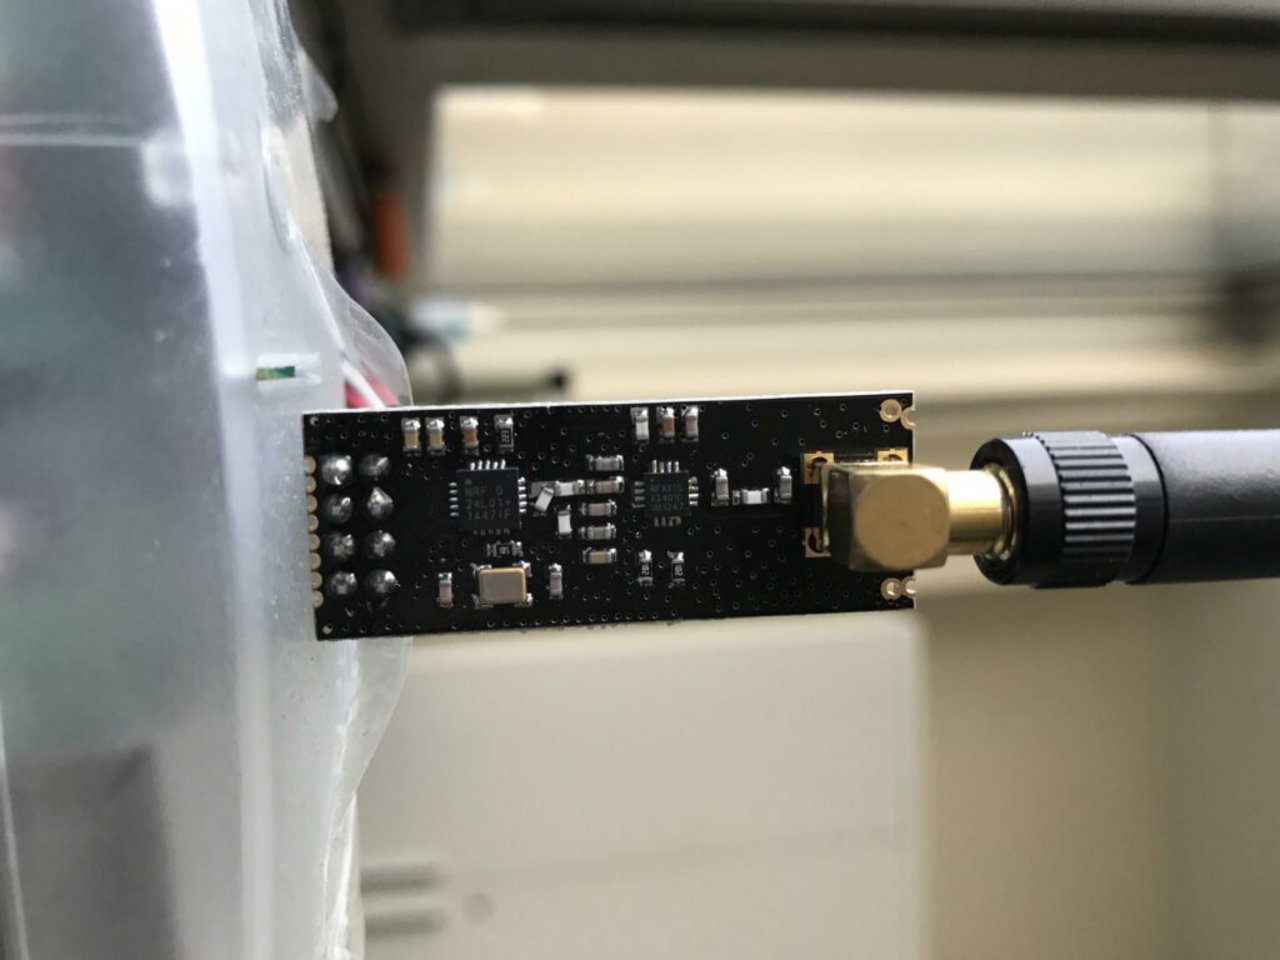
In order to achieve reasonable pricing with a highly scalable tool, we decided to use Raspberry Pi, as mentioned above, to serve as a hub and the Arduino Nano board as the controller for Neopixel matrix. For wireless communication, we used a NRF24L01+ module, since it can be easily incorporated in both the hub and the endpoints.
Project Hardware Listing
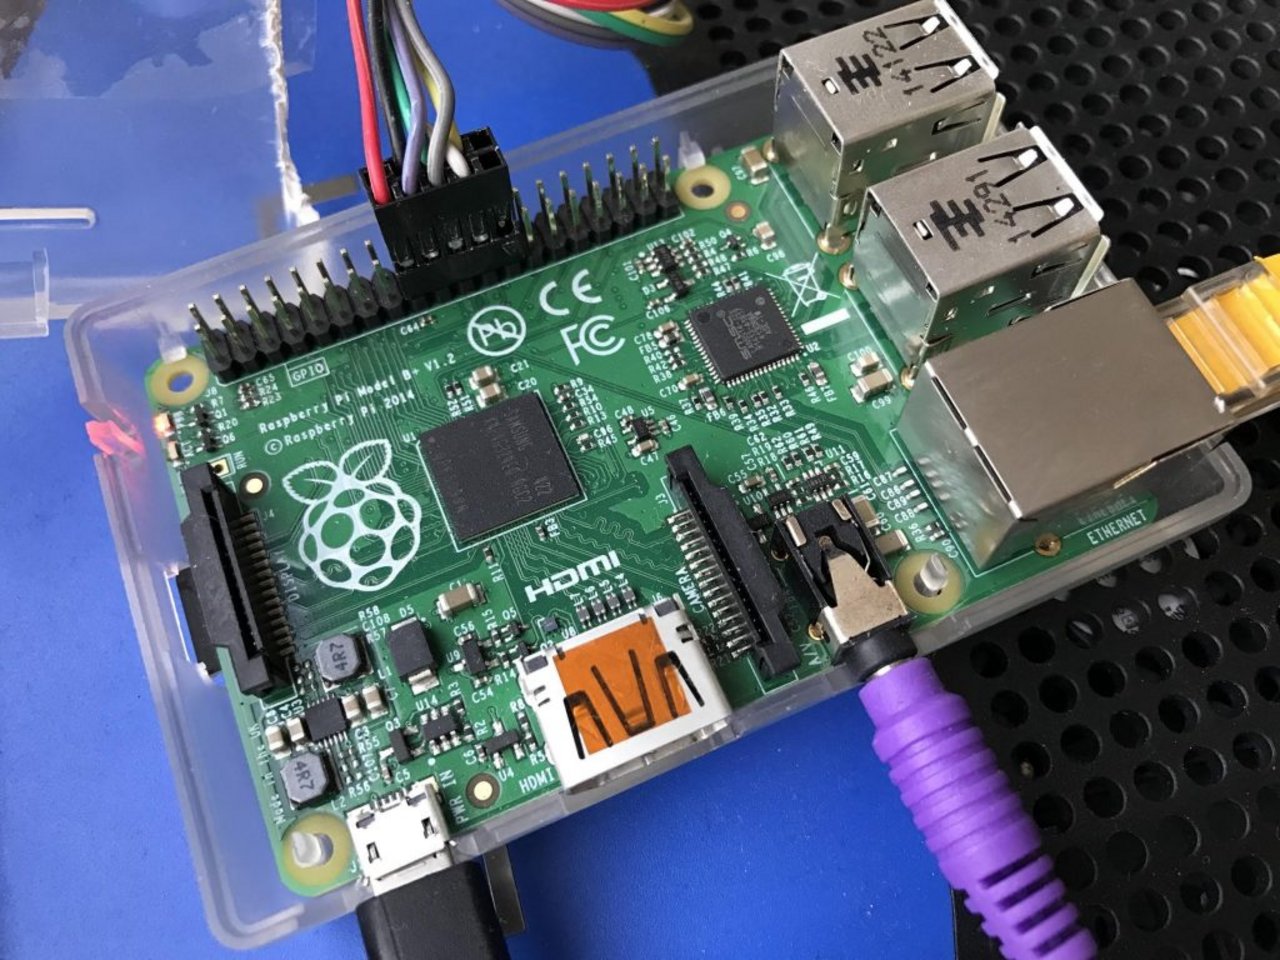
- Raspberry Pi Model B+ (running Raspbian) with SD card (any Raspberry Pi model could be used, however mind the GPIO connections).
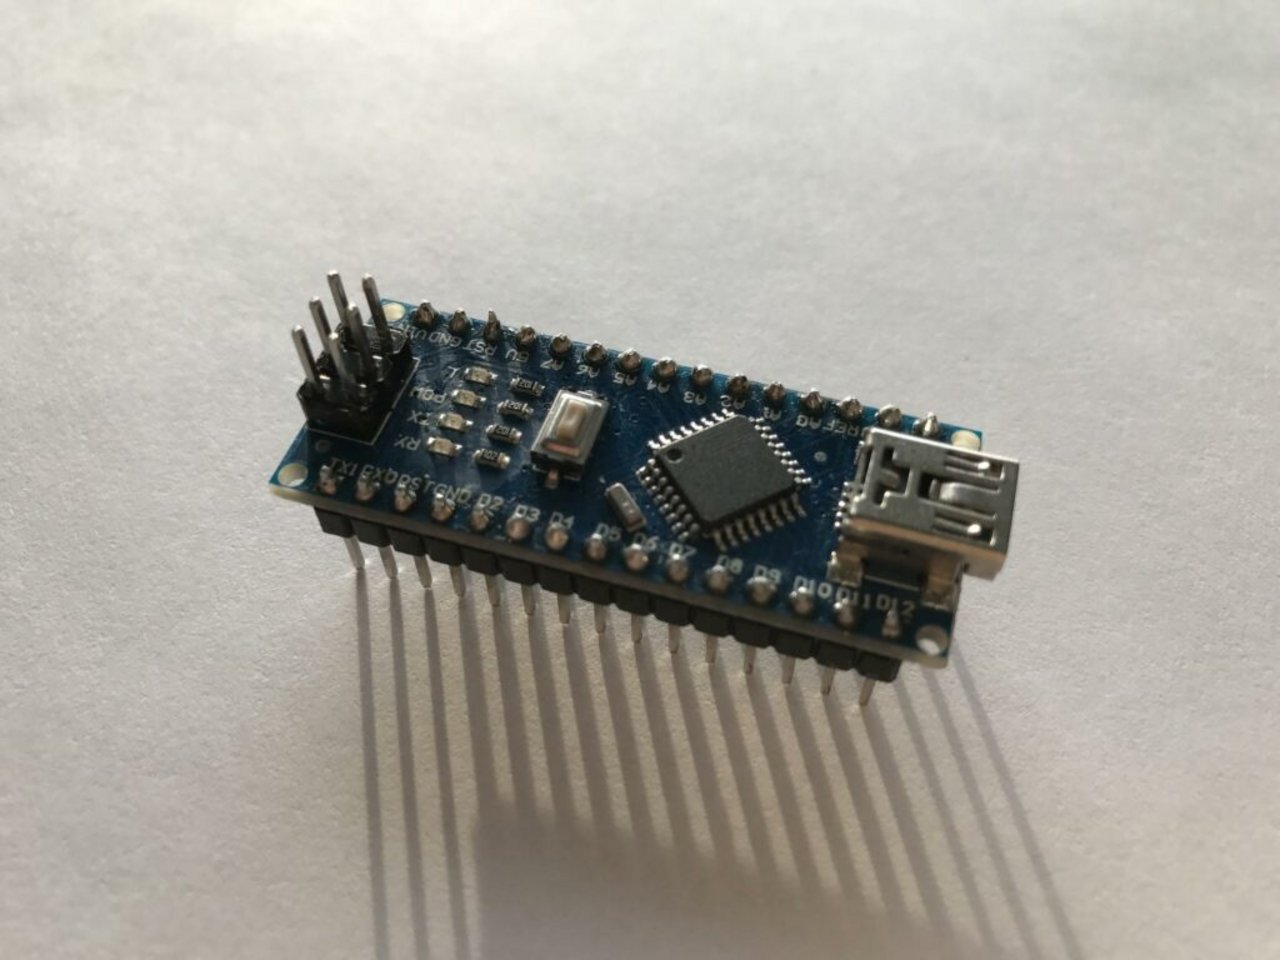
- Arduino Nano v3.3 (any kind of arduino device should be fine, please just keep in mind, that nRF24L01+ has to be powered with 3.3V).
nRF24L01+ modules (we recommend using the external antenna model on the Raspberry Pi and PCB antenna ones on indicators; in case of connectivity issues please add bypass capacitors between power and ground pins).
Neopixel LED ring or strip (we’ve used 8 LED pixels strip and 16 LED pixels ring; please mind current draw limits of Arduino when using larger number of pixels).
Universal board or printed PCB (please find included eagle schematic).
Female to female wires.
Hardware Assembly
Wiring Raspberry Pi
Connect nRF24L01+ module in the following way (we used nRF24L01+ with the PCB antenna, in external antenna model pinout is the same).
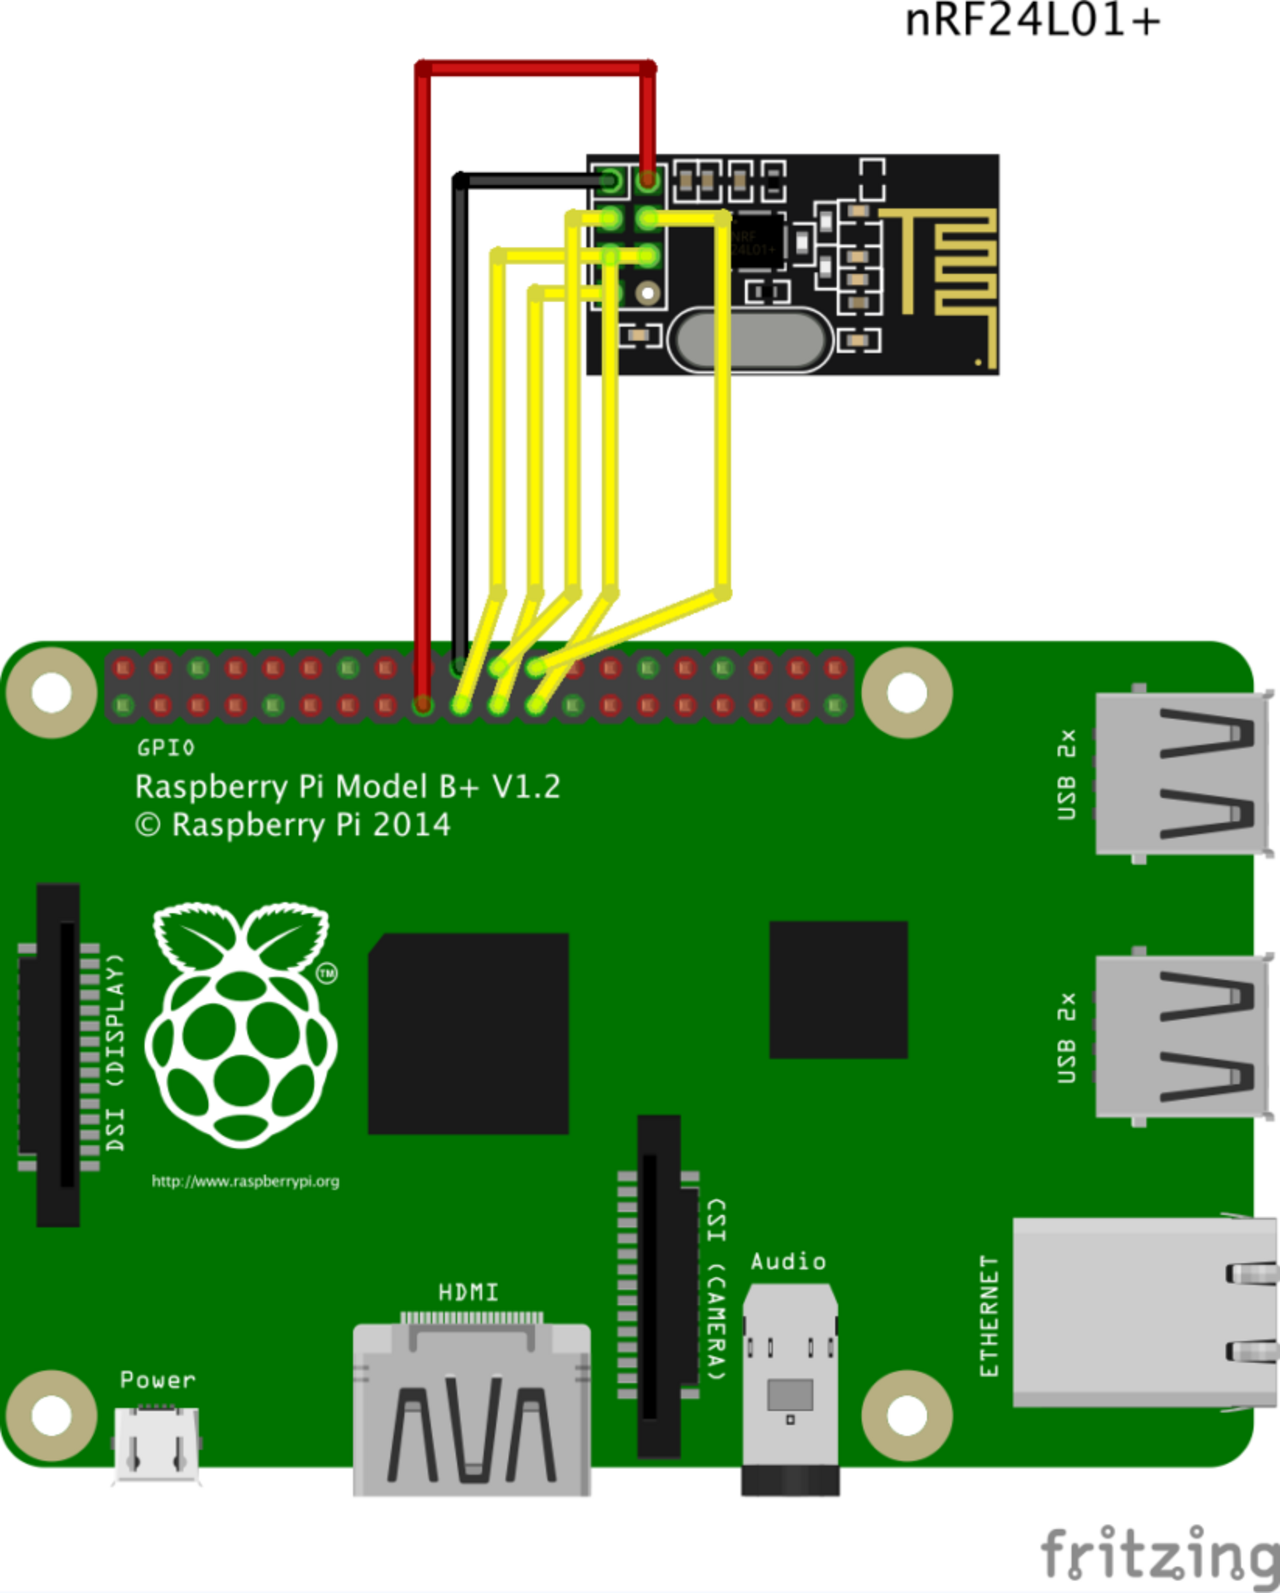
Please mind that we refer to the GPIO numbers or special function name, not pin numbers.
Connection scheme:
PI header → nRF24 header
3v3 → VCC
GND → GND
SPI_MISO → MISO
SPI_MOSI → MOSI
SPI_CLK → SCK
SPI_CE0_N → CSN
GPIO_25 → CE
NOT USED IRQ
Wiring Jenkins Indicator
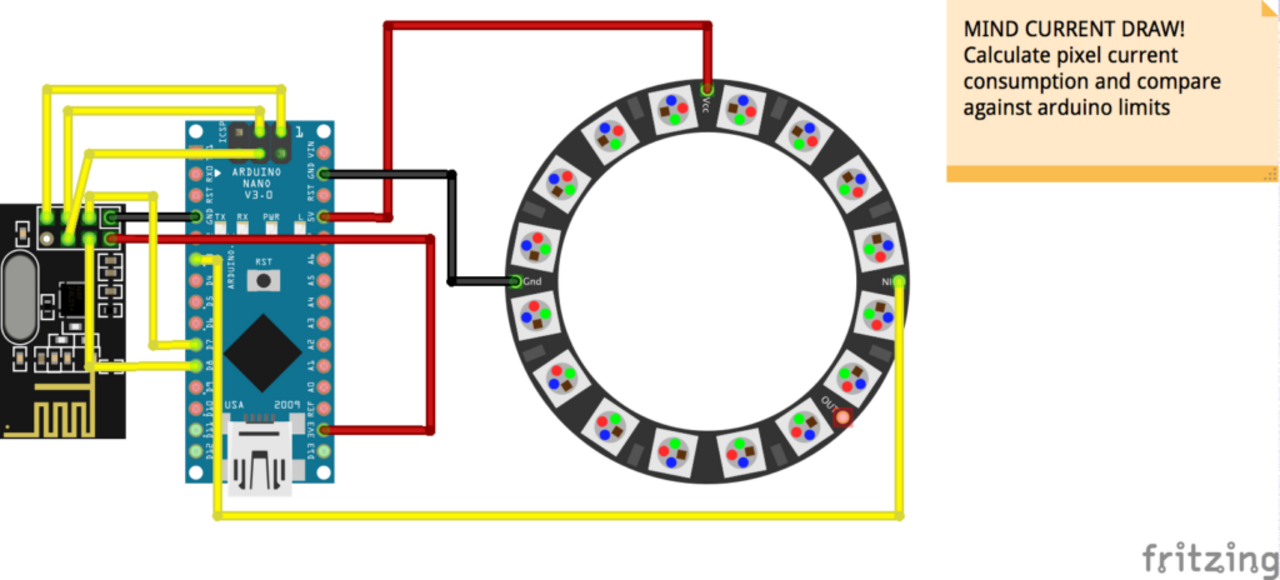
Connection scheme:
Arduino → Neopixel
5v → VCC
GND → GND
D3 → DATA_IN
We strongly suggest the use ICSP pins as side pins are often causing issues with nRF24.
Arduino → nRF24L01+
3.3V → VCC
GND → GND
CNS → D8
CE → D7
MISO → ICSP MISO (D12)
MOSI → ICSP MOSI (D11)
SCK → ICSP SCK (D13)
NOT USED IRQ
Software
Setting up Raspberry Pi
You can launch our configuration script jenkins-indicator-setup.sh (with superuser proviledges) or perform the following steps manually:
Checkout the git project repository from Bitbucket https://bitbucket.org/neofoniemobile/jenkins-indicator-rpi.git master
Install the following packages on Raspbian:
git
libboost1.50-all
python-jenkinsapi
python-setuptools
python-enum34
gcc-avr
binutils-avr avr-libc
gdb-avr avrdude espeak
For Raspberry Pi 1 or 0, extend swap size twice
Download, compile, and install the RF24 library (can be found here: https://github.com/TMRh20/RF24). At this point you should be able to get nrf24 on Raspberry up and running. You can test it by invoking sudo ./test_hardware.py 1 2 3
That script will try sending test notifications to the devices with ids 1 2 and 3. We will see how to assign ids to the devices later. You should see the following output:
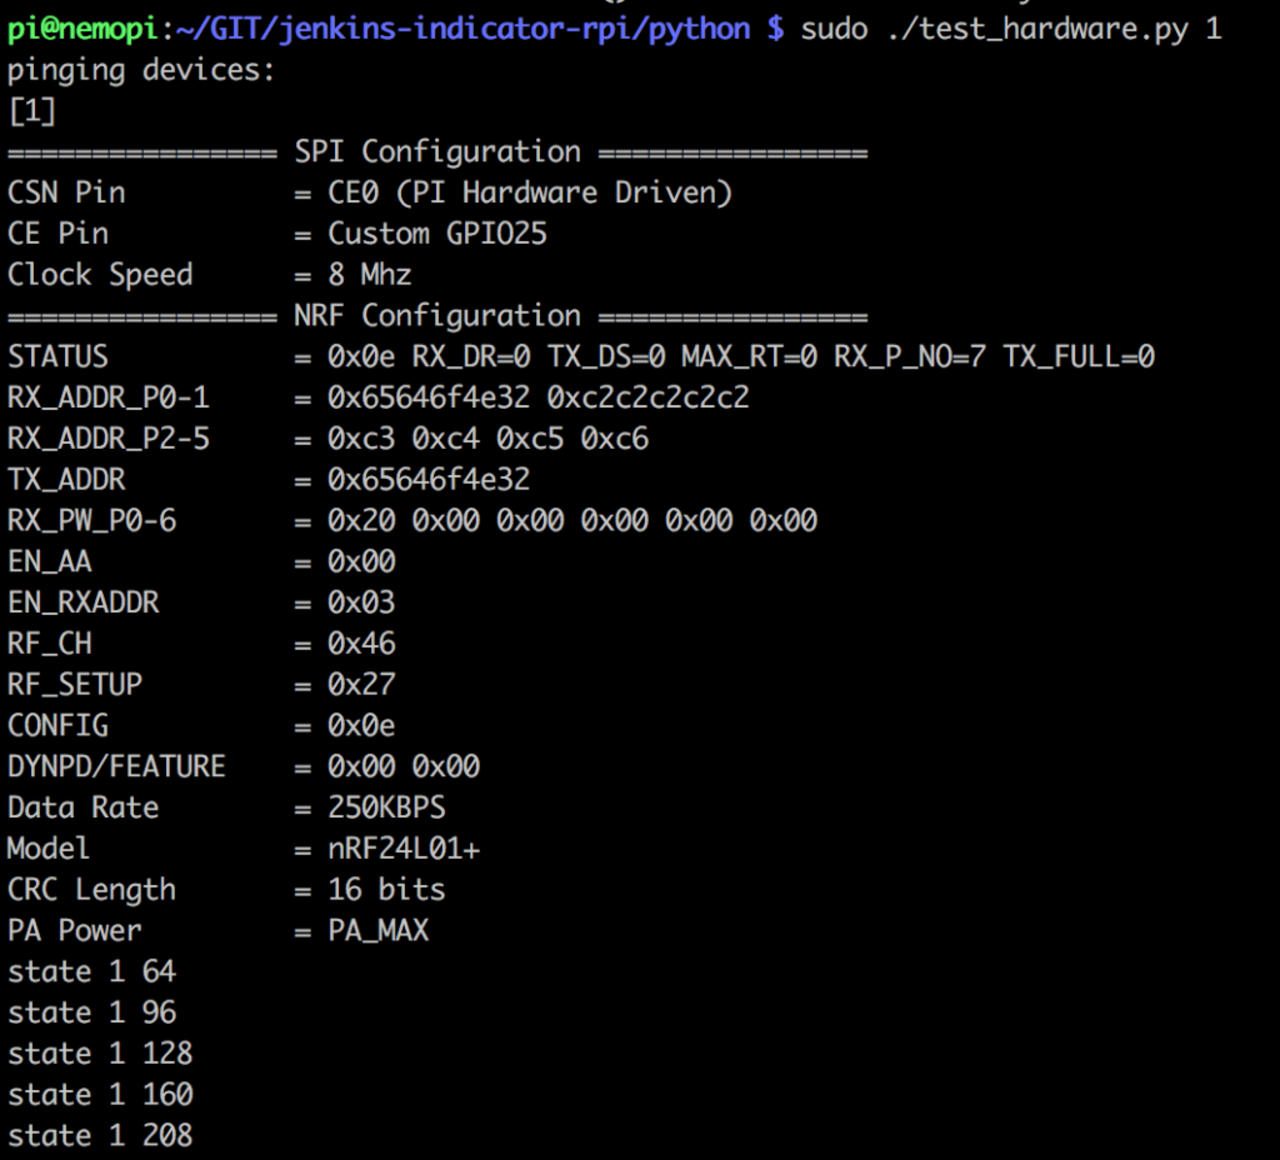
The script then tries to send emulated build status messages to the indicators with the provided IDs. These are the numbers that we used for testing but you can modify the script to use an arbitrary device, but let’s leave it until we are done with the arduino indicator part though.
Setting up Arduino
To configure the Arduino board, please perform the following steps manually:
Checkout the git project repository from Bitbucket https://bitbucket.org/neofoniemobile/jenkins-indicator-arduino.git master
Install platform.io CLI (see: platformio.org/get-started/cli)
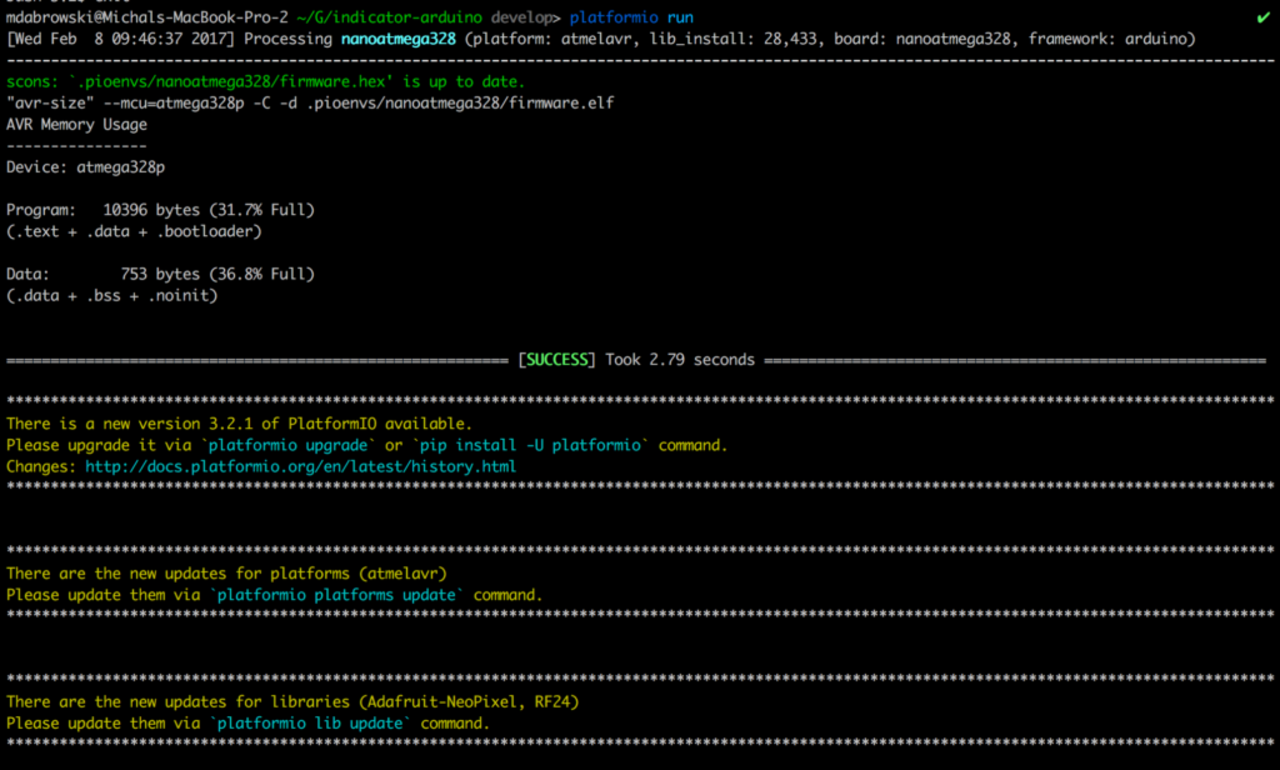
Connect the arduino nano into usb port and execute platformio run in project’s directory. You should see the following output (compilation and flashing arduino):
Setting up Arduino Indicator Eeprom
To properly run the endpoint device so that it can listen to the hub’s broadcasted messages, you have to configure the Arduino Indicator. We decided to store the configuration in two predefined addresses of the Arduino’s EEPROM memory.
Address 0x00 holds the identifier for the device, while address 0x01 holds the number of pixels that device has.
In order to make the device configuration easier, we created scripts that will generate and flash the EEPROM of your indicator directly from your Raspberry Pi.
Please connect the device to the USB port and run configure_indicator.py script, where you will be asked two questions:
what is the device ID (every indicator in your location should have a unique ID),
how many Neopixel LEDs the device has.
You should see the following output:

Testing Indicator and Raspberry Pi
Please connect your Indicator to a 5V power source (ie a phone charger or a USB port). Then run sudo ./test_hardware script as mentioned before (you should change the indicator number if you specified a different value when programming EEPROM).
After that, the indicator should start receiving messages and update the Neopixel LED matrix accordingly.
Setting up Raspberry Pi Service
After successful tests, you can proceed with the configuring service on Raspberry Pi. In the sample_service directory you can find template files that should be placed in /etc/indicator and /etc/init.d .
Please proceed with the following steps:
Set your Jenkins credentials in server_config.json file (password corresponds to the Jenkins API access token which can be generated under: [your.jenkins.server]/me/configure)

2. Move the server_config.json file to the /etc/indicator
3. Make the server_config.json file readable only by a superuser (since it contains Jenkins access credentials!)
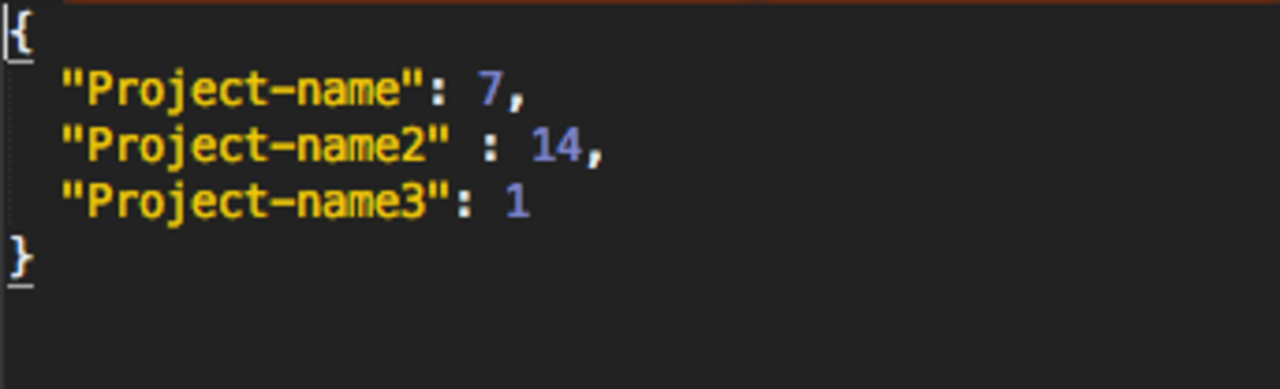
4. Set your project name – device ID mapping in the indicator_config.json file
5. Copy the indicator_config.json file to the /etc/indicator directory (depending on your preferences, you may also restrict access to this file)
6. Set DIR in indicator.service file to your location of the repository
7. Copy the indicator.service file to /etc/init.d directory
8. Give superuser root Read Write and Execute permissions to the indicator.service file
After the given steps, you should be able to start and stop the service and see its status using the following commands:
- sudo service indicator start
- sudo service indicator stop
- sudo service indicator status
If you would like to make the service start at bootup you can use update-rc.d script to do that:
sudo update-rc.d indicator defaults
That’s it! Now you should have your Jenkins Indicators up and running.
IOT Ideas
As the Jenkins Indicator project gave our team a perfect visualisation of our day-to-day work and a lot of fun too, we’re going to explore new areas and share our knowledge on much higher level of complexity and top notch technologies like Bluetooth Low Energy or low level programming.
Smart things that surround people, starting from home up to their workplace, are getting much more common year by year. We are now trying to stay ahead of these changes and give everybody a helping hand to get their own hardware and join the IoT.
We’re looking forward to show you more in the near future!
Published on 23 February 2017, updated on 08 October 2020

Tomasz Grynfelder and Michal Dabrowski
Tomasz Grynfelder – Senior Software Engineer at Neofonie Mobile GmbH, mobile technologies freak highly focused on iOS development and security. Serial conferences, meetups and hackathons participant (as both speaker and audience). After hours, great fan of cycling and sailing. Michal Dabrowski – works as Software Engineer at Neofonie Mobile. He specializes in Android application- and system development. Privately big fan of Raspberry Pi, Arduino and all platforms that enable creating hacky devices (especially the ones one can use via a mobile device later on).
Das könnte sie auch interessieren